Menu
This document is intended to give an understanding of how to use ValidSoft’s Voice Biometric solution within a CCaaS environment. A brief explanation of how voice biometrics function and how conceptually they can be used is followed by a more comprehensive and practical description of how to incorporate voice biometrics into your call flows.
The ValidSoft solution requires setting up Roles, Queues, and Call Flows on Genesys PureCloud before the users can use the solution. This section is geared toward a Contact Center administrator since it involves common terminology of a contact center. If you think your Genesys Contact Center is set up correctly, please skip this section and resume to the “Onboarding process” section.
Note: This document assumes your organization has created Subscriptions, Divisions, and DID Numbers. If you need help with them, please consult your Genesys representative.

Users on Genesys should have a specific role to be able to make and receive phone calls. This role is called “PureCloud User”.
If your agents do not have this role, add the role via the following steps:
Agents on the Genesys PureCloud platform require a softphone to be able to receive/make phone calls. If your agent does not have a phone, you need to add a new phone for them via the following steps:
Configure settings on the Phone tab.
Queues are the “waiting lines” of interactions. Agents select the “On Queue” status to enter their predefined queues. Your Contact Center should have at least one queue for voice channels with agents in it to be able to receive interactions and use ValidSoft Voice Biometrics.
If you don’t have a queue, create one by following these steps:
If you need to add yourself as an agent to your queue, follow the below steps to add members to your queue:
ValidSoft Voice Biometrics will require at least one Inbound Call Flow in Architect to use the Queue created above and send the inbound call to the agents within the queue.
ValidSoft will provide you with a sample call flow that you can use. Follow the steps below to import this call flow into your Architect and complete the process by configuring it. Alternatively, you can use your flow with the caveat that it should capture the user Id and assign it to a specific parameter, and the call should be handed off to the desired queue.
Note: Importing a flow from an outside organization may require configuration updates, even for items such as data actions with similar names. Until you update any configuration issues, Architect returns validation errors in the flow.
The Import command imports a flow configuration. Importing a flow will not merge with the existing configuration. When you import a flow configuration file into another flow, Architect overwrites any existing configuration in the original flow upon import. To import a flow:
The caller’s user Id is collected in the provided sample flow on the IVR. This user Id is associated with the caller during biometric enrollment and authentication.
To modify the properties of the user Id:
Note: Do not change the Input Data Name. If you change the input data name, make sure to update it in the “Set userId” data action menu as well, as this value is used by the ValidSoft solution.
To modify the queue to be used to route the call:
Once you have completed the configuration, Save and Publish your Inbound Call Flow.
Add a call routing configuration entry to associate a telephone number or numbers with a call route. When callers dial a number specified in the call routing configuration, they will be routed to the appropriate call flow. This document assumes your organization has already provided Genesys with DIDs (call numbers).
The ValidSoft voice biometric solution is available as a widget installed and accessed via Genesys AppFoundry. Enabling this for your environment is a prerequisite to any use of the solution. The process for onboarding is described in the following section.
Validsoft Trusted eXperience – voice biometrics solution, which allows you to enrol users with their voice (create voiceprints) during an agent’s conversation with them, and then to authenticate users with their voice during subsequent calls.
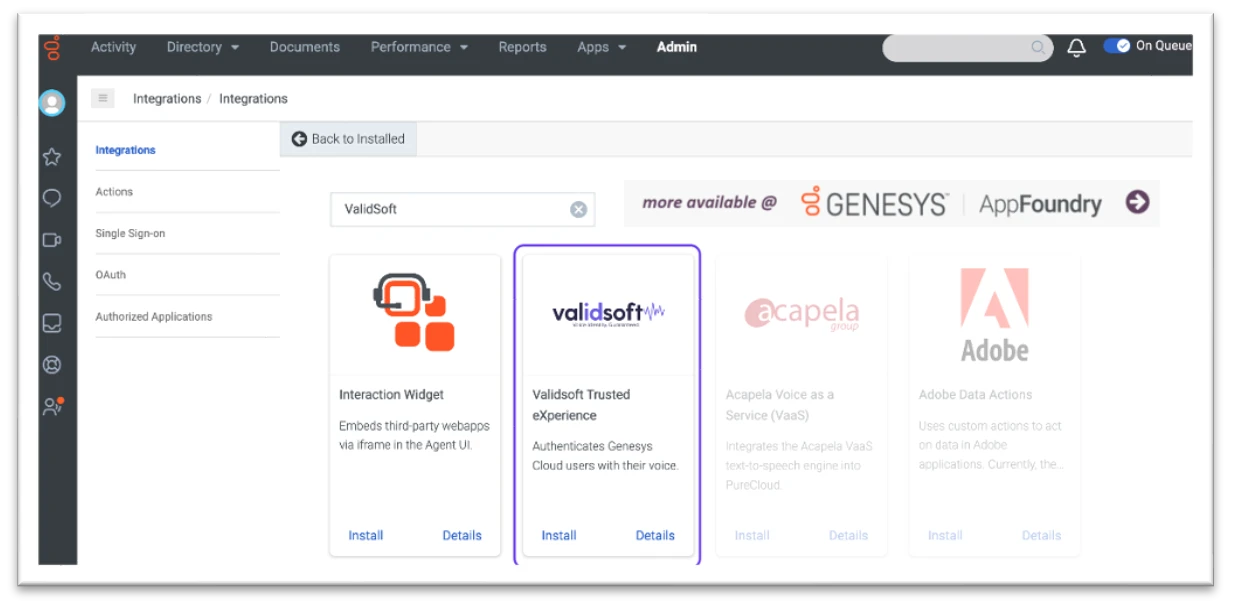
5. Click the Install button to install the app and agree with the Terms of Service. ValidSoft Trusted eXperience view would open.
6. Under the Details tab, toggle the “Inactive” switch to activate the app.
7. Click Yes to the confirmation question.
8. Click Save.
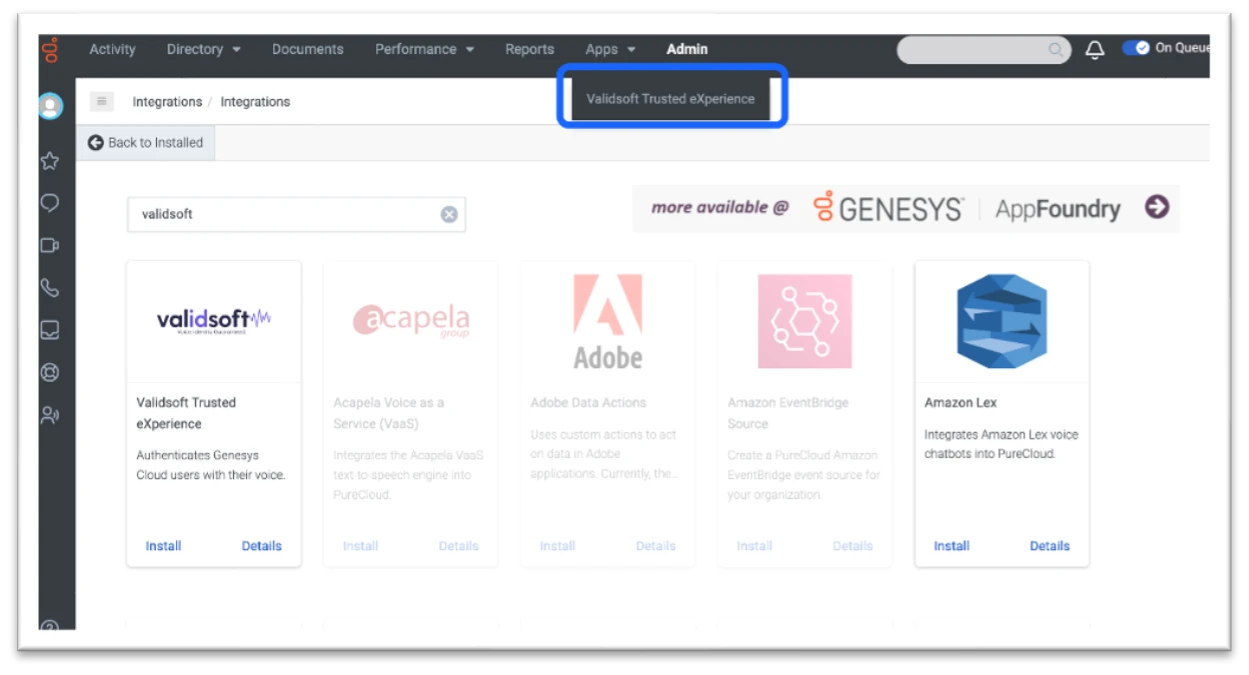
9. Reload the page. After the page is reloaded, the application will be available in the Apps menu:
10. Click the ValidSoft Trusted eXperience Application in the Apps menu. The installation wizard home page will display the following page:
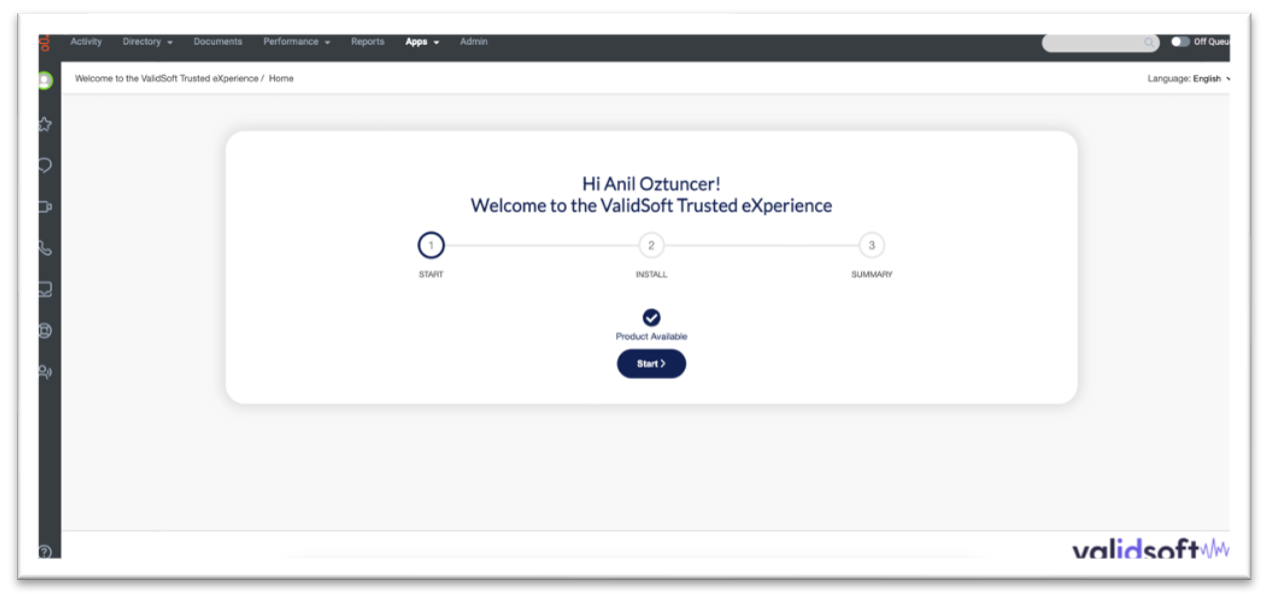
11. Click Start.
12. The summary of the installation steps will be displayed:
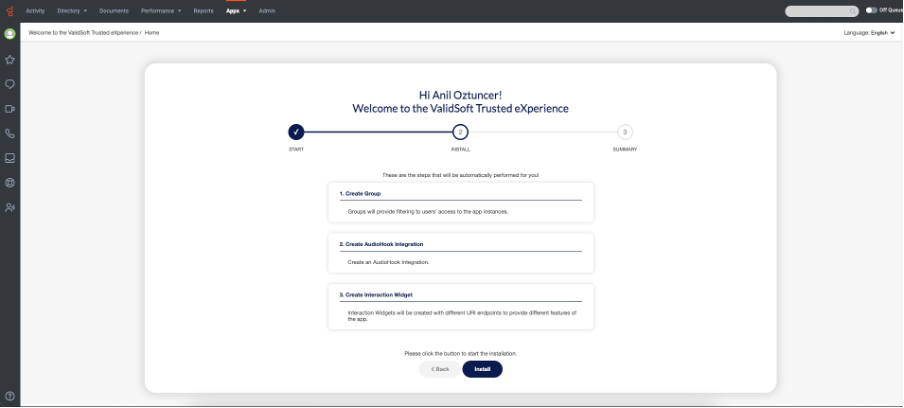
13. Click Install.
14. The summary page will be displayed upon successful installation:
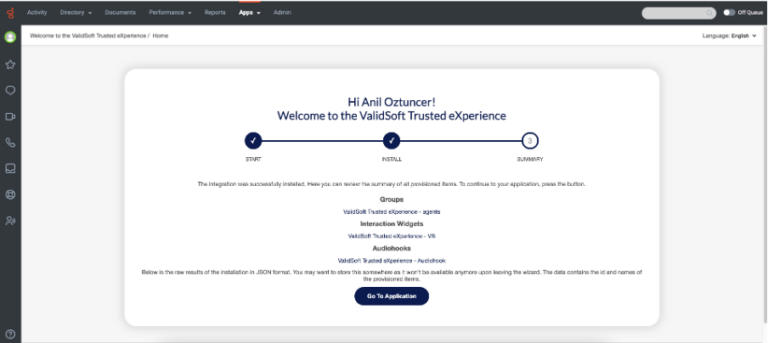
If you want to visit the configuration page for each individual component created by the install wizard, click the respective links under Groups, Interaction Widgets, and Audiohooks.
There are two ways to enable agents from your organization to use ValidSoft Trusted eXperience:

2. Change group in Group Filtering settings at ValidSoft Trusted eXperience – VB Interaction Widget -> Configuration -> Properties -> Group Filtering:
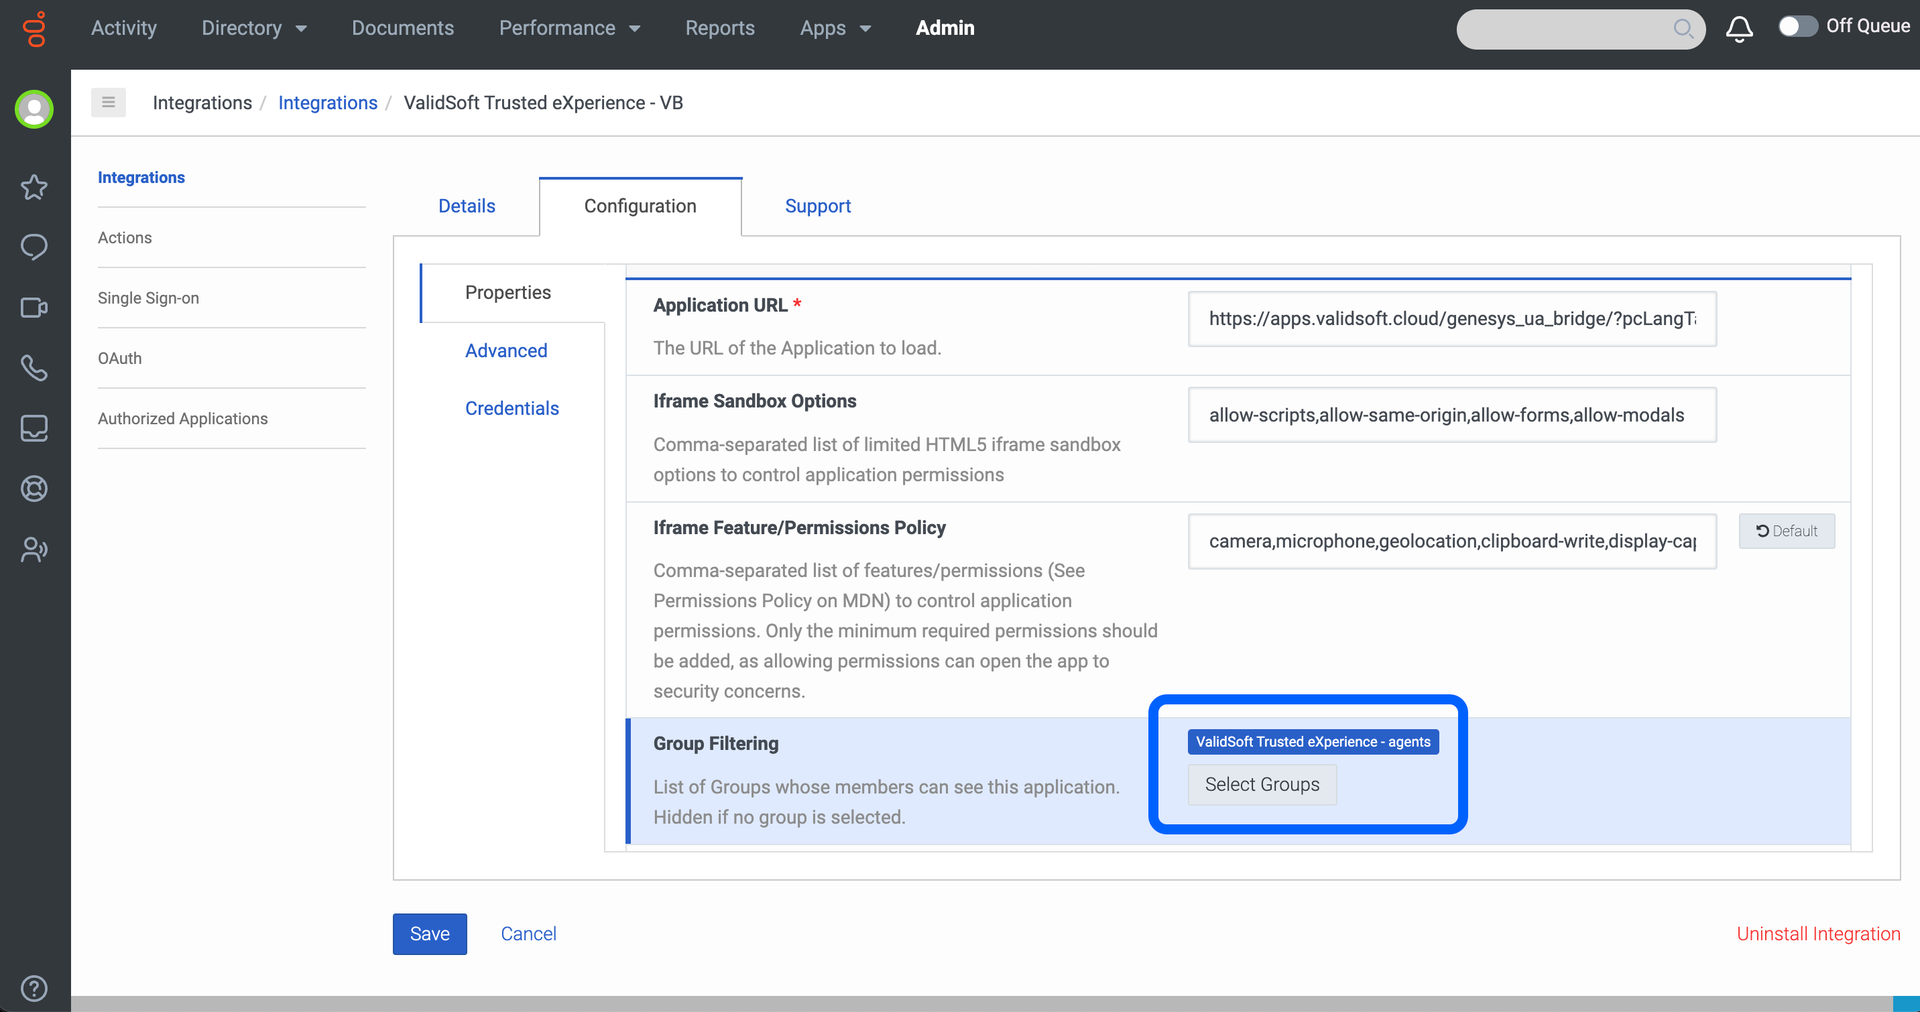
All members of this group will have access to Trusted eXperience Interaction Widget during calls:
Further configuration is not required.
Voice Biometrics (VB) is the technology that enables the recognition of people from their voice characteristics by measuring the distortion their physical makeup (physiology) creates on sound. It identifies individuals based on their physical makeup by extracting information from their voices. It is also called speaker recognition or speaker authentication. The terms speaker verification and speaker identification are also used but refer to specific scenarios of use, as explained later in the document.
Voice biometric systems process audio utterances to extract certain features (characteristics) that are speaker specific. From these features a statistical model – commonly called a voice print or a voice signature is built. When comparing new audio, e.g. authenticating a person against their previously enrolled voice print, the same process is applied and a similarity measure is obtained through pattern matching, the value of which indicates a pass or fail.
There are different features that can be extracted from a speech signal and speech scientists’ class them from low-level to high level. A low-level feature relates to information that is extracted from very short periods of speech, e.g. a frequencies analysis based on circa 20 milliseconds of speech. High-level features are obtained from longer periods, for example language gimmicks or the frequency of words used by a speaker that can be both estimated over a full sentence or many sentences. All types of features can be used for voice biometrics, but research has shown that low-level features are by far the most practical and efficient.
Because of the way speech is produced, a voice utterance will include characteristics that relate to the way air flows from the lungs to the mouth when a person is talking, and more precisely to how this air flow is affected by the shape of the vocal tract. The low-level features capture this effect and consequently the information exploited by voice biometric systems closely relates to a physical characteristic of the speaker, i.e. their vocal tract.
As explained above, the process of using voice biometrics is started by capturing a voice print from a user, known as the enrolment process. Once this has been successfully achieved, the voiceprint is recorded for future use and can be used for authenticating a user in subsequent calls. When a user calls the CCaaS, they are recorded responding to agent or IVR discussions and their speech is used to create another voice print. This new voice print is compared against the recorded one and, if the match is sufficiently close, the voice biometric system responds with a true match.
This process is formed from several parts; the user is identified by a unique ID and then needs to be asked to join the VB program and if they agree, formal consent has to be given by them. These can be achieved either by an IVR process or by direct contact with an agent, depending on the specific use case in question. Once these two steps are completed, the agent engages the user in conversation and the user’s speech is streamed towards ValidSoft’s VB system via control of the widget. At this point, the VB solution collects sufficient speech from the user and starts to create a voice print from it. Once the voice print quality exceeds internal thresholds, this will be flagged back to the widget and the call flow can pass to the next stage in completing the call.
At the end of the enrolment process, a voice print is stored against the unique user ID for future use in authenticating the user when they next call.
When a user who has already been enrolled calls in again, their enrolled status allows the call flow to take a different path and the widget is used as an authentication step. In this case, the user is engaged in conversation by the agent and their speech is again streamed towards ValidSoft’s VB system. This streamed speech is used to create another voice print which is compared to that stored against the user ID in the database. A response is then returned via the widget to report that a match has been made, or on the contrary situation, that the user’s voice print does not match that stored against their recorded ID.
At this point, the normal call flow can take charge and make use-case-specific decisions based on the user being reliably authenticated or being detected as unmatched.
ValidSoft’s Voice Biometrics is very effective at comparing a user’s speech against the voice print recorded in the past. As such, they can be seen as a significantly more secure method of authentication than say, Knowledge Based Authentication using names, dates, and other agreed keys. As such, the VB solution can be seen as a direct substitute for the KBA component in a call flow, where the agent’s posed set of questions and screen prompts are replaced by a short script to engage the user in conversation. A full set of error and ‘not happy’ flows will need to be developed around the main ‘happy’ flow but much of this will be common with the KBA solution that can be replaced. E.g. similar error flows can be followed if the user fails the VB process to that taken when the user fails to correctly answer their KBA questions.
Voice Biometrics rely on the sounds that our bodies make and are therefore largely insensitive to different languages. However, VB does rely on a mix of sounds with different energies to allow a strong voice print to be collected and these sounds vary with different regions and accents. The ‘out of the box’ solution is adjusted to ensure that all languages and accents will be acceptably treated, with no further work and this is perfect for many situations where the user base covers a wide range of languages and accents.
Voice Biometrics requires a certain amount of good-quality speech to be able to function. This also excludes periods of silence such as pauses and gaps between words. This means that the minimum amount of usable speech is always shorter than the audio duration.
The enrolment process requires more speech than recognition because Voice Biometrics requires enough speech to build a reliable voice print whereas recognition equates to a pattern-matching exercise.
Out of the box, the ValidSoft system is set up to need at little as 6 seconds of speech for enrolment and at little as 3 seconds for recognition. These settings are a balance between the minimum that the system requires and the maximum period that an agent can be expected to wait for a recognition decision. If you find that your enrolments are not being successfully completed or that recognitions are producing an excessive number of False Rejects (i.e., calls being rejected even if they are actually valid), then ValidSoft can analyze your setup and can adjust these parameters if necessary.
In some cases, the out-of-the-box solution benefits from some additional tuning to focus on a more specific user group. For example, the user base may consist almost entirely of pure English native speakers based in a single geographical area where the accent is common across the group. In this case, the VB can be tuned to ensure the highest possible match quality with a minimum of false negative matches (known users being rejected).
Tuning needs real-life data to be analyzed and for conclusions to be drawn. We recommend that it is not applied until several months of real volume activity have taken place. If you feel that your voice biometric solution would be improved by tuning, please request further information.
Agents will need the training to understand both parts of the VB process, enrolment, and subsequent authentications as well as the messages and different information that will appear on their screens at this point.
Much of the training will involve persuading the agents to offer VB to users as well as taking part in the enrolment process and understanding the authentication process.
The following section offers some ideas for agent scripts for enrolment and authentications:
Suggested Offer Script (Assumptive – immediately following security process)
Voice ID is a new service that uses your voice like a fingerprint to provide quicker, easier, and more secure access to your accounts. I’m going to set it up for you now. Is that, ok?
Objection Handling Script (no response)
Most of our customers have enabled Voice ID. Can I ask why you don’t want to?
Not enough time
It won’t take any extra time on this call, and it will save you time the next time you call. Are you sure I can’t set you up now?
Don’t understand how it works
We use a recording of our conversation to create a voiceprint that represents the unique characteristics of your voice so that the next time you call we can compare it and make sure that only you can access your accounts. Are you sure I can’t set you up now?
Happy with the existing method
I understand. As you know, we take the security of your accounts very seriously and Voice ID provides an extra layer of protection to your accounts and will make it quicker and easier to talk to us every time you call. Are you sure I can’t set you up now?
Privacy, security
You are completely within your rights to object, and we will respect your wishes, but I do want to reassure you that the information you provide won’t be used outside of XYZ Bank and that it’s impossible to recreate an artificial version of your voice from the data we hold. Are you sure I can’t set you up now?
Objection Not Handled
I completely understand. You will probably get asked again next time you call so I’ve sent you a link to the relevant part of our website if you want to find out more or change your mind.
Consent Script (Usually displayed as verbatim text on agent screen – requires legal review)
Great. One last question before I set you up. Can you please confirm that you are happy for XYZ Bank to store and process your voice so that we can provide secure access to your account?
Consent Confirmation
Thanks. We’ll use this call to create your voiceprint and send you a notification when it’s ready to use.
Enrolment Confirmation (if required – during or at end of the call)
Voice ID is now enabled on your account so next time you call you’ll just need your account number, and we’ll use your voice to give you quicker, easier, and more secure access using just your voice.
Voice Biometrics relies on the inherently personal characteristics of the human voice, and therefore, the associated data and processes are often considered a special class of personal information. In many jurisdictions, additional regulations apply to their use and management. You are responsible for ensuring that your use of Voice Biometrics is permitted under your local regulations and that you adhere to any conditions the regulations mandate.
The most common condition for the use of Voice Biometric data is user consent. This means that the user is aware and gives permission for you to carry out the processing in advance of any taking place. This most often occurs during enrolment, and in our experience, asking for consent also provides the optimum user experience as it prepares users for the changed authentication experience whilst maintaining their confidence in the security of the application.
The ValidSoft application supports the capturing of consent and will not carry out any processing until it has been accepted, but you are responsible for ensuring that the way in which you obtain this consent complies with your local regulations. This does vary between jurisdictions and continues to evolve as regulators’ understanding of the technology improves. In some cases, a simple disclosure and the absence of an objection may be all that is required, but in others, users may even be required to give their written consent in advance of processing. Our default recommendation is to ask for a positive affirmation from the user following disclosure by an IVR or agent but even this may not be sufficient in some cases. ValidSoft can give (non-legally binding) advice based on our long experience, but local legal advice should be sought since the penalties for compliance failure are generally punitive.
As mentioned above, recording user consent is the main means of managing a user. Deleting a user’s consent has the effect of removing that user from the database, and no further voice biometric activity will take place until the user is re-enrolled by re-recording their consent.
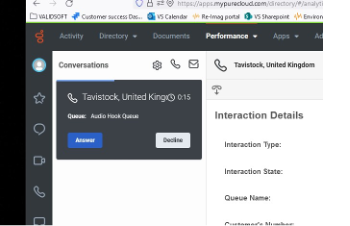
A new call is presented on the screen as shown above pending the agent accepting it. Details are then shown in the next screen.
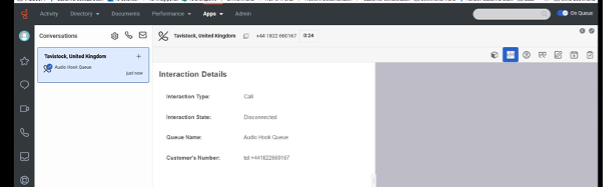
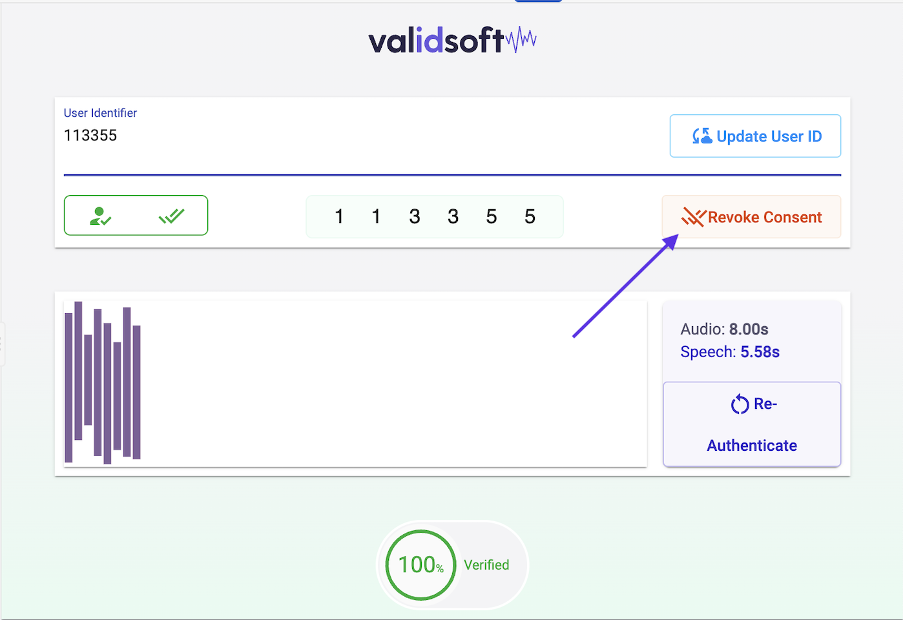
Once the call has been accepted, the agent is required to launch the ValidSoft app indicated here by the red arrow.
The app will automatically populate the user identifier from information entered by the user at the start of the call flow if they have already enrolled, otherwise, the agent needs to enter the ID manually and store using the “update User ID” button as shown below.
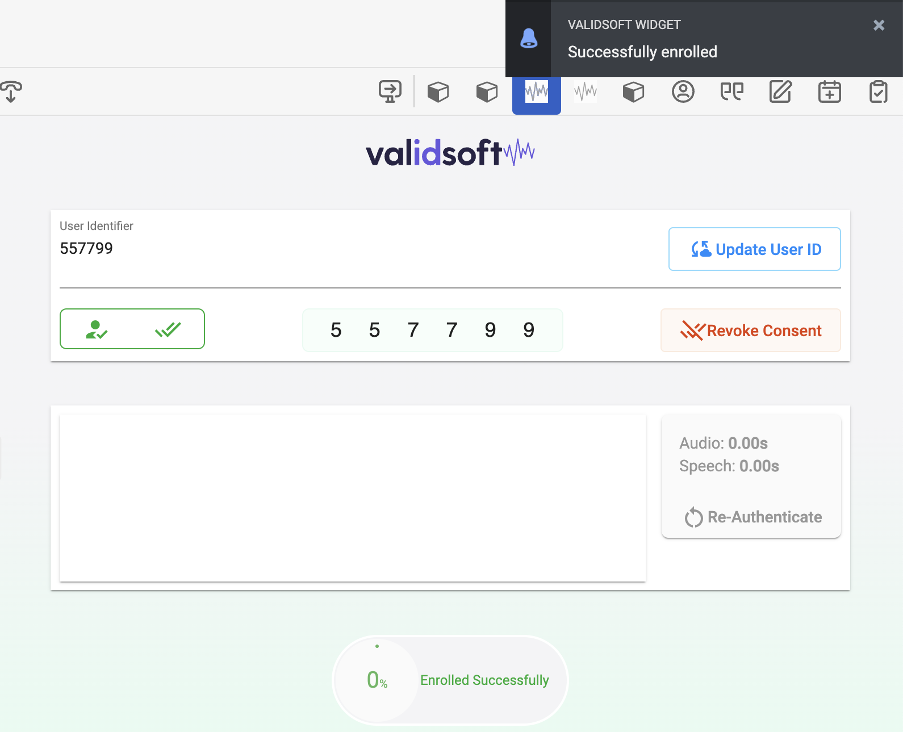
If they are already enrolled, the following screen will start and speech collection from the user will start to display. Note the difference between the audio (connected audio path time) and speech (audio recognized as speech, excluding silence, etc). A progress indicator is also shown to help the agent.

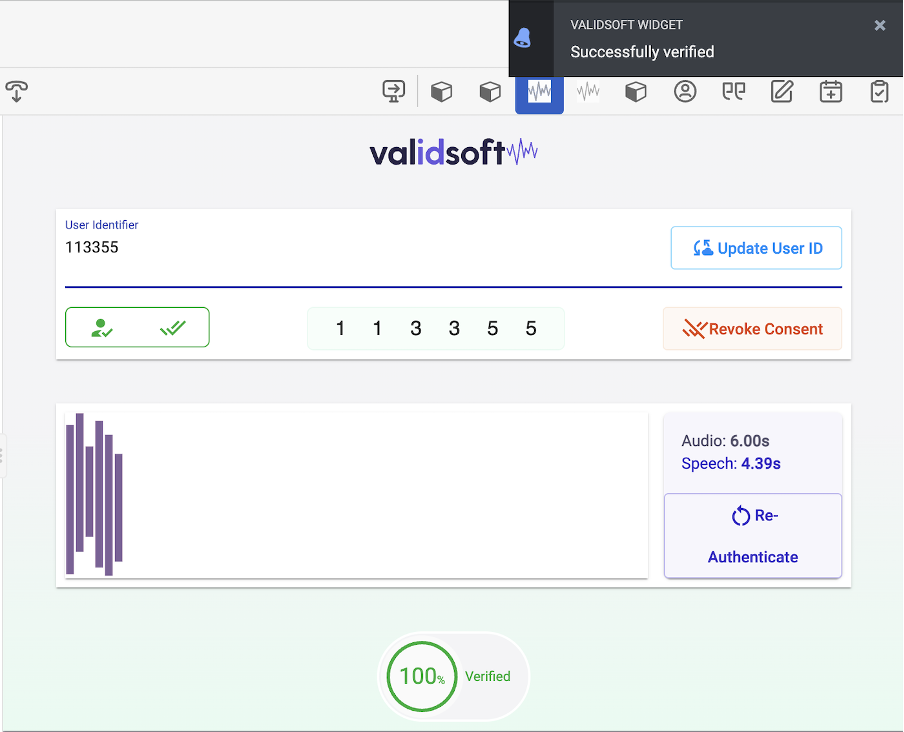
When sufficient audio has been collected for the VB system to recognise the user, a pop-up shows in the upper right of the agent screen and the progress indicator changes to show ‘verified’ as shown below:
If a user is un-enrolled, the agent manually enters their User ID into the field and confirms that they have consented to their biometrics being recorded.
The screenshot below shows how a user can be deleted by revoking their consent (arrowed). This has the effect of removing them from the database and, at the same time, their voiceprint is removed from the database. This process is non-reversible so if the user wishes to re-join the voice biometric authentication, they will need to go through the enrolment process once again. To prevent erroneous deletions, the agent is presented with a confirmation screen emphasizing that the process cannot be reversed.
It is important to remember the differences between authenticating a user with a Knowledge-Based solution (KBA) such as passwords (and other known data) and authenticating a user using voice (or any other) biometric solution. Using a KBA solution means that the response that a user gives to the authentication question has a binary result – the answer to the request for a password is either ‘correct’ or ‘incorrect’.
By comparison, Voice Biometrics is a probabilistic authentication mechanism that depends on many features of a speaker’s voice to authenticate, and the answer to a request to authenticate will be a probabilistic result that suggests that the user is ‘probably’ who they allege they are – to a very high level of probability.
The other difference between KBA solutions and Voice Biometrics is that the risk that the user is authenticating with a stolen or otherwise compromised password increases over time as the opportunities for that password to be read, overheard, stolen, or otherwise known, increase.
In contrast, a Voice Biometric solution has the same probabilistic risk of incorrect authentication throughout the lifetime of the user’s enrolment in the solution. The very small risk that the user is not who they allege that they are is no difference between the first use of the Voice Biometric solution and the 1000th. This is because this risk is related to the probability that two voiceprints are the same. In fact, with some of the AI techniques used by ValidSoft, the likelihood that the user is not who they allege they actually decrease (i.e. the technology becomes more accurate over time).
There are two parts to the testing of a Voice Biometrics solution that need to be considered.
To support functional testing of the Voice Biometrics capabilities, the following considerations should be applied.
Match scenarios are tests to ensure that the stored (enrolled) voice print matches that is being presented to the solution.
As with any new solution, users and agents will experience misunderstandings and minor problems. The following lists some of the more likely ones and their remedies:
User enrolment and authentication failures are usually associated with poor-quality audio from their side. This could be caused by a lot of background noise, the user speaking too quietly or the user not speaking enough. The agent needs to understand that if they cannot hear or discern what the user is saying, then the voice biometric system will have similar difficulties. Advising the user to find a quieter location and/or speaking louder should help this problem. The agent will see on their screen how much user speech is being presented to the voice biometric solution and will need to be trained to encourage the user to continue speaking until sufficient speech has been captured.
Users who experience problems can be re-enrolled as a first step. The agent should ensure that the user is speaking from a quiet area and that they can be clearly heard before revoking consent and then re-enrolling the user.
If you see a pattern of failures from users, please contact us (cs@validsoft.com) and we will look more deeply into the potential causes of the failures.
ValidSoft offers the world’s fastest, most accurate, and most precise voice biometrics authentication and identification platform: ValidSoft VIP®. It works in the Cloud, Private Cloud, SaaS, On-premise, and On-device and is a true Omni-Channel with no loss of performance. ValidSoft’s VIP technology differentiates itself on three strategic pillars; Precision & Accuracy (Security), Data Privacy & Protection (Integrity), and Omni-Channel Excellence (Consistent Experience & Future Proofing).
ValidSoft saves businesses money, stops fraud, and eliminates consumer frustration by providing a seamless, omni-channel solution to enable secure, fast, friction-free customer engagement.
Our website can be found at www.validsoft.com.